Harvey's Counterfeit Beacon
by Harvey Hartman
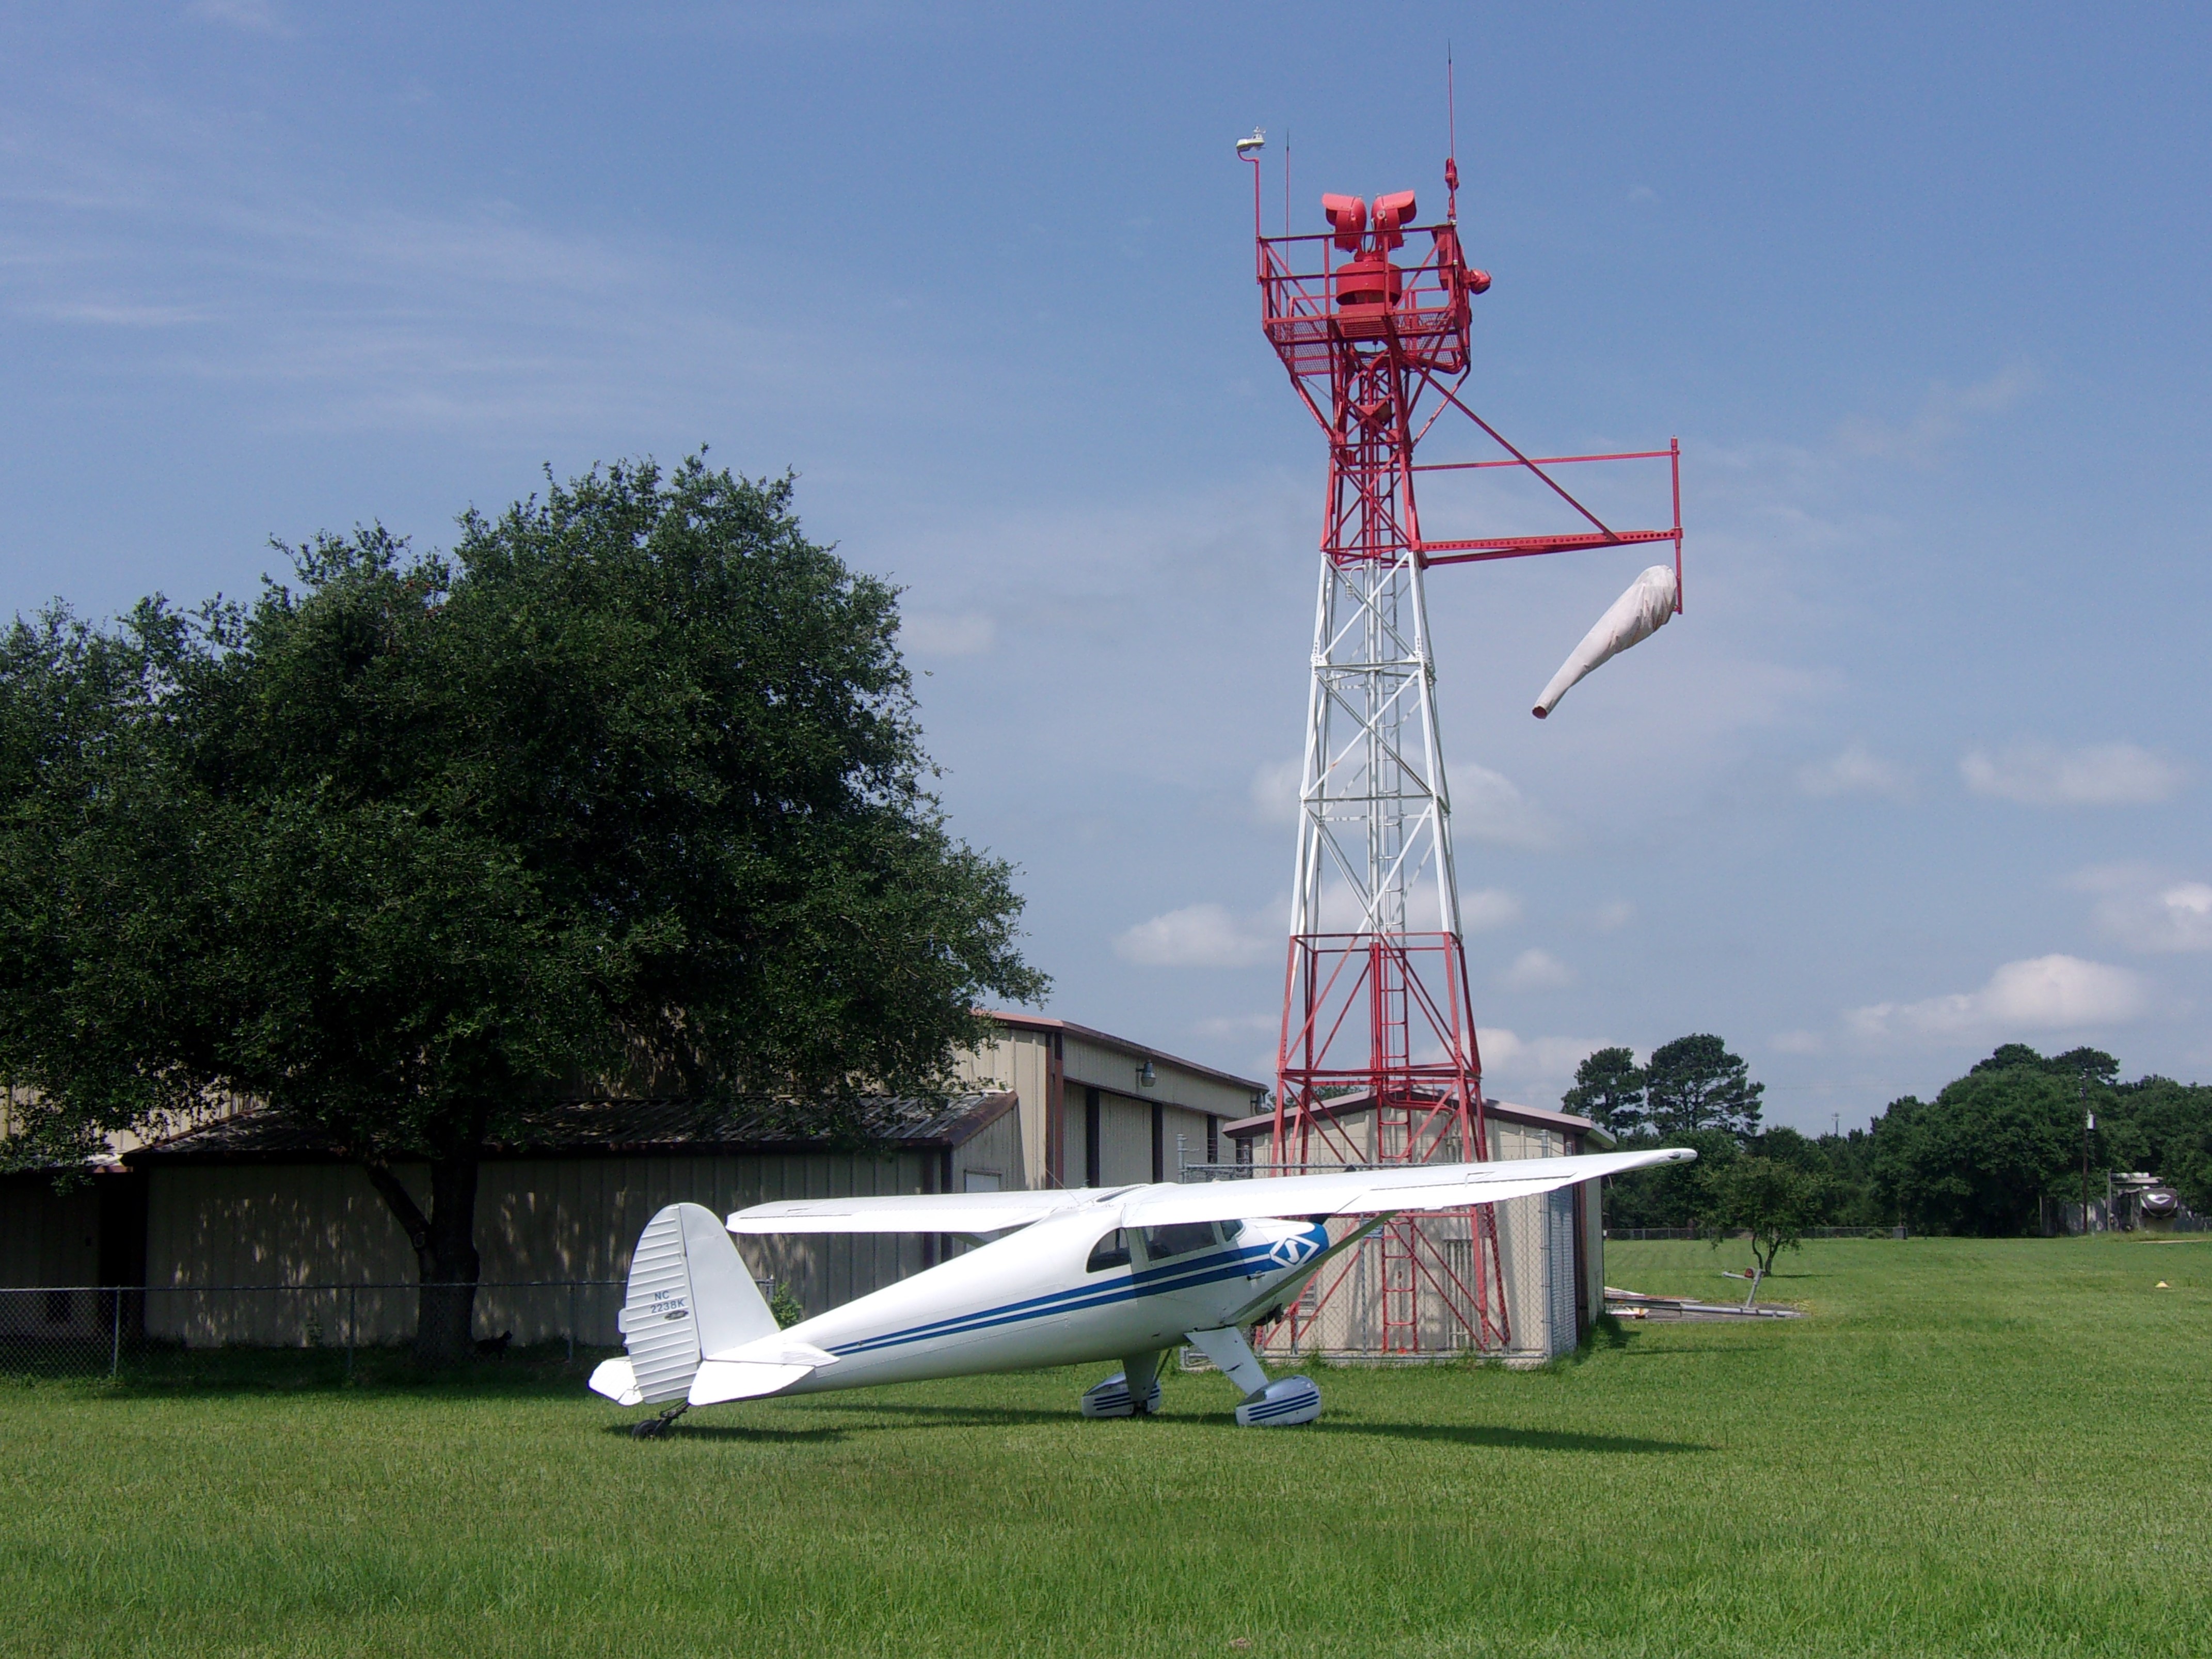
When I first started erecting my vintage airway beacon tower, I was unaware of its historical significance. I simply wanted this cool old beacon for our airport. Therefore, an exact restoration wasn’t in my original plans. While I DID erect the tower close to its original condition, I took a few liberties to upgrade it in a few structural areas and improve its beacon and electrical system. The control system (still in progress) is being brought up to modern standards and will include a receiver that will allow a pilot to activate the beacon from his/her cockpit prior to landing. (i.e. PCL, or “Pilot-Controlled Lighting” in FAA terminology.)
The Original Vintage Beacon
The beacon that came with my tower was a 36″ diameter Crouse-Hinds model DCB-36, was double-sided with two very-expensive Fresnel glass lens sets, and was equipped with two 1,200,000cp (that’s 1.2 MILLION candlepower!) bulbs. (One was the in-service bulb and the other bulb was a backup mounted in an automatic bulb-changing mechanism.) Introduced in 1932, this model quickly became the standard beacon for the Federal Transcontinental Lighted Airway System. It also eventually replaced most, if not all, of the earlier beacons as normal wear and tear, as well as storms and vandals, took their toll. (The big DCB-36 is also noteworthy in that it was chosen by the Lighthouse Division of the Department of Commerce in 1936 to upgrade its coastal lighthouses from carbon arc, and acetylene-powered beacons.) However, the venerable DCB-36 design is now 85+ years old and replacement parts are getting hard to find. And those parts that ARE still available are getting very expensive. Therefore, I made the disappointing decision to not reinstall the historic original beacon. Instead, I built a stand-in (a stinkin’ counterfeit, if you will) beacon to put on the tower and the original beacon will be restored and displayed inside my hangar where it’ll be safe.
Building My “Counterfeit” Beacon
Due to my decision to not reinstall the original beacon, I set out to find a replacement beacon. I quickly discovered that new (or even USED) beacons aren’t cheap!!! Not one willing to forfeit quality and style for an affordable price, I elected to design and build my own; a substitute with two priorities in mind. The substitute had to be robust and cheap to maintain/repair, and it must look like something out of the late 1920s – early 30s.
With the tower being a late-1920s model, I decided to model my homemade beacon after the earlier “double-drummed” beacons. (“Double-drum” is slang for beacons that use individual housings, or “drums”, mounted back-to-back to produce the alternating white and green flashes signifying the location of a civilian flying field. The later “Single-drum” beacons such as the DCB-36 used one housing that contained a single bulb in the center with a green lens on one side of the housing and a clear lens on the opposite side to produce the two flashes.


I decided to model my “counterfeit” beacon after the 24″ double-drummed design. However, my fondness for old steam locomotive headlights and America’s glorious 1920-30s Art Deco period may have also influenced my new beacon’s design.


And while it will be virtually impossible to stop the storms and vandals, at least I can make their damage less expensive. Therefore, my stand-in beacon uses common yard floodlights instead of the exorbitantly-expensive high-powered metal-halide bulbs and Fresnel lenses, and its housing is constructed of thick steel instead of cast aluminum like the original. Unfortunately, it was beyond my capabilities to construct a replacement for the original rotator base so I’m reusing it for the time being, but with a steel shield added around it for increased protection.
My new beacon had a humble beginning as an old propane tank which donated its heavy steel end domes to become my new beacon’s backshells.


I then built their mounting yokes and an adapter box that would mate the beacon to the rotator’s output turntable. This completed the basic beacon and its mount.


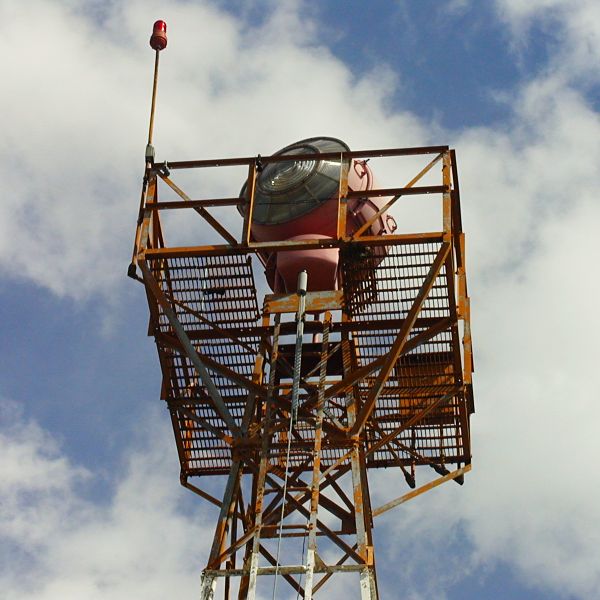
The Ring Shields were fabricated next and the visors followed. And this was the end result.


A trip to the powdercoaters resulted in this sexy thing! Gratings were fabricated and were added in front of the bulbs to prevent birds from attempting to build nests during the day when the beacon is stationary. From ground level, these “platinum silver” grates look like fluted glass lenses.


The beacons’ elevation angles can be adjusted using this simple jack screw device between 0 degrees (on the horizon) to +20 degrees above the horizon.


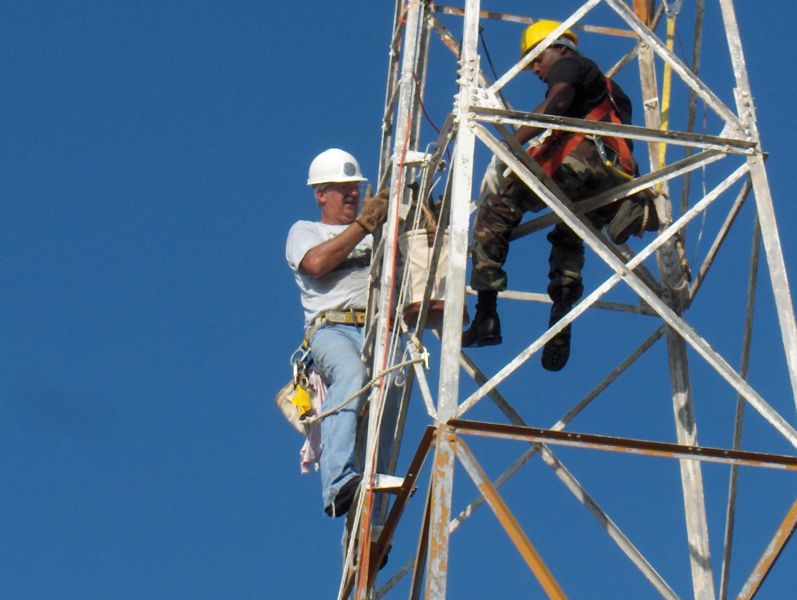
We hoisted the “counterfeit” beacon to the top of the tower on 9 April 2016.


And IT WORKS!
Note: The bright white “dot” centered under the beacon in the video is a floodlight that illuminates the windsock when the beacon is operating.
That’s where my “counterfeit” beacon and its tower are as of January 2017. I still have to design and build the PCL system but as the video showed, the beacon can be operated manually for demo purposes.
October 2017 Update
I have recently located and purchased an original late-1920s “double-drummed” Crouse-Hinds DCB-224 airway beacon to replace my “counterfeit” beacon.
I suspect that your first question is probably wondering why I’m replacing the homemade beacon that I spent so much time and effort building to replace my big DCB-36? The simple answer is because it’s not original. It’s incorrect for me to call my beacon tower project a 1920’s Airway Beacon when the beacon itself is a 2016 product. “BUT, (someone is bound to point out) the reason for not reinstalling the DCB-36 was to avoid exposing an historical artifact to potential damage. How is putting up a different antique beacon going to change that?” My reasoning is that while it would be virtually impossible for me to prevent such damage, at least I can make that damage less expensive to repair. I accomplished this by designing my homemade beacon to use common PAR38 landscaping floodlights with their built-in lenses and reflectors, instead of the original beacon’s hugely-expensive Fresnel lenses, and special bulbs. While the large, double-sided design of the 36” diameter DCB-36 would be difficult to modify, the twin single-sided DCB-24s can successfully use the same PAR38 bulb system as my homemade beacon. This will allow me to say that both my tower and its beacon are alumni of the old Federal Transcontinental Lighted Airway System.
So what’s going to happen to my homemade beacon? Of course, it’ll still serve duty on my tower until the rebuilt DCB-224 beacon is ready to replace it. However, my ultimate plan has always been to have an operational beacon on my tower AND a backup beacon in reserve that would replace the in-service beacon when it needed major repairs that would likely render our airport’s beacon out of service for an extended time. My homemade beacon will serve that purpose well.
For the purists out there, please note that my “PAR38 modifications” are not permanent (i.e. the drums are not drilled, cut, or otherwise irreversibly altered); therefore, the drums can easily be returned to original condition someday. (Unfortunately, the same cannot be said for the propane tank used to create my “counterfeit” beacon.)
—Harvey